# API information
Integrating S1Seven services within your server application, such as a SAP module, an automated delivery note service, or any other application managing quality certificates, is accomplished with the S1Seven REST API and optionally our Async API.
# General information
# Policies
S1Seven APIs are classified into either production or staging APIs. A production API is one that has been made generally available for public use and is stable. A staging API is one that is still in development or is for internal or limited use and whose stability cannot be guaranteed. Staging APIs may be removed or modified at any time without advance notice. The following policies apply to production APIs only.
# Deprecation Policy
The current version of production-level APIs will happen once we release v2. When a new version of APIs is made generally available (not beta), the older version will be deprecated and will cease to function after six months. Once an API is removed, any request to it will result in a 404 error.
# Breaking Change Policy
Changes that do not break an API, such as adding a new attribute can be made at any time. Changes that break a production level API such as removing attributes or making major changes to the API’s behavior will only be done with advance notice of X days. However, there may be rare occasions where we are forced to make breaking changes without advance notice due to legal, performance, or security reasons.
# REST API
# Swagger
All endpoints documented here will link to a Swagger UI hosted on our staging webservices allowing you to try the API with the closest conditions from production systems. For convenience, a Swagger UI aggregating all endpoints is available here.
On the top left, select the server address matching the address of the Swagger you are currently browsing.
On the top left, click
Authorizebutton. Once logged in or if you use a long lived access token, fill thebearerfield with your access token.
# Rate Limit
The maximum number of REST API calls / client / minute is 10. Some endpoints might be subject to different rules.
# Requests
The API access pattern for all S1Seven REST endpoints is:
https://<s1seven_service_subdomain>.<s1seven_domain>/api/<service_resources>
or
https://<s1seven_proxy>.<s1seven_domain>/api/<service_resources>
The expected value for <s1seven_service> is the name of the service, such as auth-service, user-service, km-service, certificate-service, pipe-service.
The list of valid resources and actions per service :
  "auth-service" : {
    "auth": {
      "actions": ["read_one", "create_one", "sign_in", "sign_out", "revoke"]
    },
    "sessions": {
      "actions": ["read_one", "read_many", "delete_one", "delete_all"]
    },
    "accesstoken": {
      "actions": ["read_one", "read_many", "create_one", "update_one", "delete_one"]
    }
  },
  "user-service" : {
    "users": {
      "actions": ["read_one", "read_many", "create_one", "update_one", "delete_one", "confirm", "reset"]
    },
    "companies": {
      "actions": ["read_one", "read_many", "validate_one", "create_one", "update_one", "delete_one", "confirm"]
    }
  },
  "km-service" : {
    "cointypes": {
      "actions": ["read_one", "read_many", "create_one", "update_one", "delete_one"]
    },
    "nodes": {
      "actions": ["read_one", "read_many", "create_one", "update_one", "delete_one"]
    },
    "wallets": {
      "actions": ["read_one", "create_one", "update_one", "delete_one"]
    },
    "identities": {
      "actions": ["read_one", "read_many", "create_one"]
    },
    "transactions": {
      "actions": ["read_one", "read_many", "partial_sign", "sign", "send"]
    }
  },
  "certificate-service" : {
    "certificates": {
      "actions": ["read_one", "create_one", "validate_one", "render_one", "notarize_one"]
    }
  },
  "pipe-service" : {
    "hooks": {
      "actions": ["read_one", "read_many", "create_one", "update_one", "delete_one"]
    },
    "events": {
      "actions": ["read_one", "read_many", "update_one", "retry_one"]
    },
    "mailhooks": {
      "actions": ["read_one", "read_many", "create_one", "update_one", "delete_one"]
    },
    "mails": {
      "actions": ["read_one", "read_many", "update_one", "retry_one"]
    }
  },
# API version
To access a specific API version use the x-version header, if undefined it will default to version 1 of the API.
curl --request POST \
  --url https://<api-endpoint> \
  --header 'content-type: application/json' \
  --header 'x-version: <major-version>'
# Example
To show how to access resources, let's take the sessions resource from auth-service as an example, located under the development subdomain s1seven.ovh :
- https://auth.s1seven.ovh/api/sessions
- https://app.s1seven.ovh/api/sessions/
# Error Handling
Responses are formatted in the standard REST format, with a status field showing an error code and a message field with a text description of the error. The possible error codes are described with each API endpoint. The message can be a string, a string array or a JS object.
For example, here is the response for a failed login request:
https://<s1seven-proxy>/api/auth/login
{
  "statusCode": 401,
  "path": "/auth/login",
  "timestamp": "2021-06-10T14:40:52.602Z",
  "message": "Wrong credentials provided"
}
# Authentication
Most endpoints require authentication to submit a request to the S1Seven servers. The API reference for each endpoint specifies the types of authentication needed to access the endpoint.
S1Seven uses username/password and access tokens to add a layer of security to the API requests from users.
# Username and Password
For short term access, such as for the web UI, the user can use a username (or email) and password to generate an access token and a refresh token by calling the login endpoint. The access token must be added to the authorization header (as a bearer token) to every REST call.
The following code samples show the types of authentication that can be used with this endpoint.
curl --request POST \
  --url https://<auth-service>/api/auth/login \
  --header 'content-type: application/json' \
  --data '{
    "username":"so",
    "password":"password"
  }'
TIP
The access token is valid for 15 minutes and the refresh token is valid for 60 days.
# Access Token Usage
Once you have an access token, you can call endpoints using it, such as:
curl --request GET \
--url http://<user-service>/api/companies/<company-id> \
--header 'authorization: Bearer <jwt>'
The header field has the format:
--header 'authorization: Bearer <token>'
# Refresh the token
Once you have a refresh token, you can use the refresh token endpoint to get a new access token.
This is an example of refreshing the token:
curl --request GET \
 --url https://<auth-service>/api/auth/refresh \
 --header 'content-type: application/json' \
 --header 'refresh: Bearer <jwt>'
# Long lived access token
# Create

TIP
The access token is restricted to a company resources and a mode.
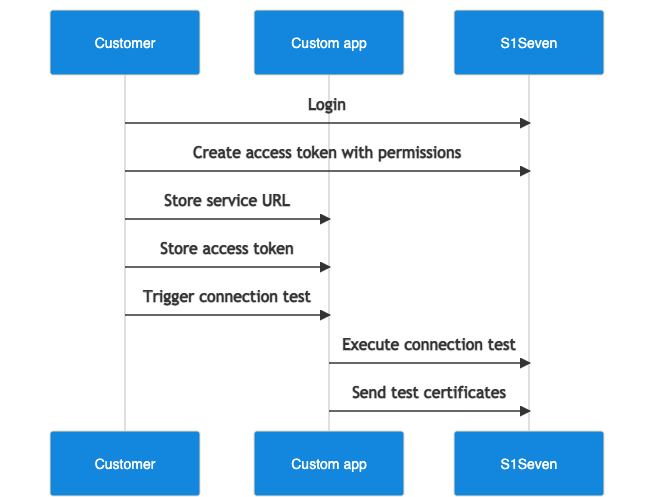
For applications or scripts that require long term access, an access token key with a one-year time limit can be created by calling the create accesstoken operation and setting :
- the company id in
companyheader, - the JWT in
authorizationheader, - the
modein the query, - an optional
description, - an optional expiration timestamp in seconds,
expiresIndefault to one year. - the scopes (which actions on which resource) that this token will grant access to.
The returned JWT must be added to the authorization header (as a bearer token) for every REST call. The Admin can generate several API keys for different app usages.
curl --request POST \
 --url https://<auth-service>/api/accesstoken?mode=test \
 --header 'content-type: application/json' \
 --header 'company: <company-id>' \
 --header 'authorization: Bearer <jwt>' \
 --data '{
   "description": "test token",
   "expiresIn": 1843565761,
   "scopes": {
      "auth": {
        "actions": ["read_one"]
      }
    }
  }'
Example Scopes
{
  "auth": {
    "actions": ["read_one"]
  },
  "cointypes": {
    "actions": ["read_one", "read_many"]
  },
  "nodes": {
    "actions": ["read_one", "read_many"]
  },
  "wallet": {
    "actions": ["read_one"]
  },
  "identities": {
    "actions": ["read_one", "read_many"]
  },
  "transactions": {
    "actions": ["sign", "send", "read_one"]
  },
  "companies": {
    "actions": ["read_one", "update_one", "validate_one"]
  },
  "certificates": {
    "actions": ["read_one", "validate_one", "notarize_one"]
  },
  "hooks": {
    "actions": ["create_one", "read_one", "read_many"]
  },
  "events": {
    "actions": ["read_one", "read_many"]
  },
  "mailhooks": {
    "actions": ["create_one", "read_one", "read_many"]
  },
  "mails": {
    "actions": ["read_one", "read_many"]
  }
}
TIP
For a complete list of available scopes, refer to CompanyTokenScopesDto in the OpenAPI documentation.
WARNING
The access token (jwt property in the response) should be stored safely as it will be displayed only once and is available for up to 1 year by default.
# Revoke
A long lived access token can be revoked and its reference deleted from the database by calling revoke accesstoken endpoint.
Those parameters should be provided :
- the JWT in
authorizationheader, - the company id in
companyheader, - the id from the access token created above
curl --request DELETE \
 --url https://<auth-server>/api/accesstoken/<access-token-id>\
 --header 'content-type: application/json' \
 --header 'company: <company-id>' \
 --header 'authorization: Bearer <jwt>'
# Common requests
# Register user

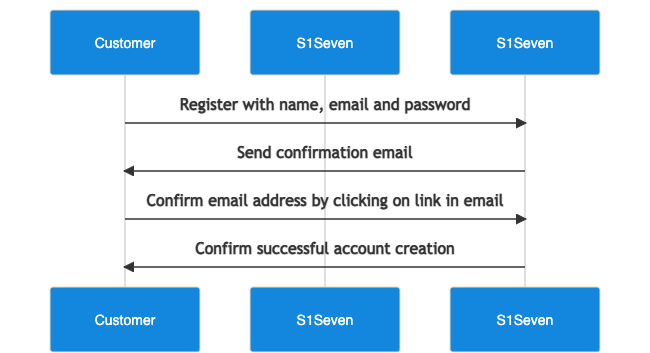
- A new user can be registered using the create user endpoint.
- If you need to resend the verification email, use verify email endpoint.
- Once you confirmed the user creation, you can login, if successful it will return an
accessTokenandrefreshTokenthat can be used inAuthorizationandRefreshHTTP headers to authenticate the next calls to our services. Those values will also be set in cookies. - Retrieve user information with me endpoint
- You can call the refresh token endpoint with the
RefreshHTTP header value set torefreshTokenreturned above, to create a newaccessTokenonce it has expired or call the login endpoint.
WARNING
The refreshToken should be stored safely as it is available for 60 days.
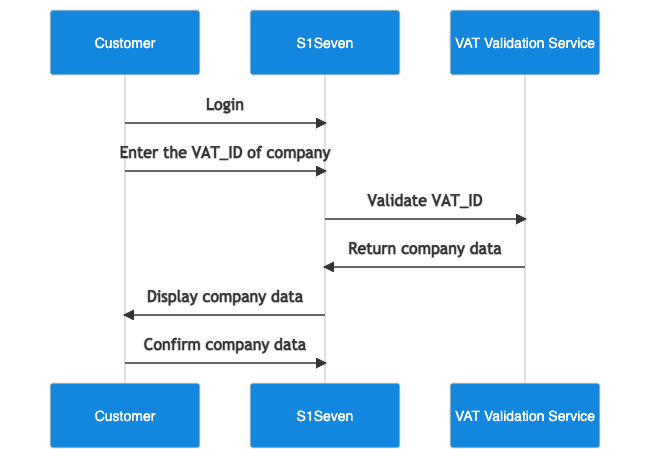
# Register a company

- login
- A new company can be registered using the create company endpoint.
- Once created you can get the list of the user's companies with the me endpoint.
# Find own user
To fetch information about the user and companies attached to that account, the find user endpoint can be used. The user id is deducted from the JWT token provided in the header.
curl --request GET \
  --url https://<user-service>/api/users/me \
  --header 'content-type: application/json' \
  --header 'authorization: Bearer <jwt>'
# Async API
We provide a read-only (subscribe only) Async API that allows you to subscribe to events dispatched by our application. To connect to our broker use the URL patterns :
- for MQTT :
mqtts://broker.<s1seven_domain>:8883 - for Websocket :
wss://broker.<s1seven_domain>/ws/mqtt
# Events
The events are sent to the owner of the resources, as MQTT messages (always) and Webhooks requests (when webhooks have been registered).
- For MQTT messages, the subscription patterns look like :
user/<user_id>/<mode>/<resource>/<action>company/<company_id>/<mode>/<resource>/<action>
The list of available resources and actions that produce events :
{
  "companies": {
    "actions": ["update_one"]
  },
  "access_token": {
    "actions": ["create_one", "update_one"]
  },
  "wallets": {
    "actions": ["create_one", "update_one", "delete_one"]
  },
  "identities": {
    "actions": ["create_one", "notarize_one"]
  },
  "transactions": {
    "actions": ["sign", "send"]
  },
  "certificates": {
    "actions": ["notarize_one", "receive_one"]
  },
  "hooks": {
    "actions": ["create_one", "update_one", "delete_one"]
  },
  "mail_hooks": {
    "actions": ["create_one", "update_one", "delete_one"]
  }
}
# Authentication
In order to connect to the broker, the client needs to be authenticated with a valid access token (JWT).
When connecting as a user,
- the user id should be used with the vhost using the pattern
<vhost>:<user_id>asusername - the refresh token can be used as
passwordand the entityType must beuser - the
clientIdshould follow the patternuser_<user_id>_*
- the user id should be used with the vhost using the pattern
When connecting as a company,
- the company id should be used with the vhost using the pattern
<vhost>:<company_id>asusername - an access token can be used as
passwordand the entityType must becompany - the
clientIdshould follow the patterncompany_<company_id>_*
- the company id should be used with the vhost using the pattern
# Authorization
In order to subscribe to events, the client needs to be authorized with a valid access token, containing the appropriate scopes.
When subscribing as a user,
- the topic should start with
user/<user_id>/ - all possible subscriptions can be consumed
- the topic should start with
When subscribing as a company,
- the topic should start with
company/<company_id>/ - subscription topic needs to match the authorized scopes from the access token.
- the topic should start with
For example to subscribe to company/<company_id>/live/certificates/notarize_one, the access token scopes should at least contain :
...
"certificates": {
  "actions": ["notarize_one"]
}
...
Node.js MQTT / Websocket client example
const mqtt = require('mqtt');

const entityType = 'company';
const entityId = `company_id`;
const vhost = '';
const mode = 'live';
const resource = 'certificates';
const action = 'notarize_one';

const username = vhost ? `${vhost}:${entityId}` : entityId;
const password = `company_access_token_jwt`;
const clientId = `${entityType}_${entityId}_test_123456789`;

const topic = `${entityType}/${entityId}/${mode}/${resource}/${action}`;

const url = 'mqtts://broker.s1seven.dev:8883';
// const url = 'wss://broker.s1seven.dev/ws/mqtt';

const client = mqtt.connect(url, {
  clientId,
  username,
  password,
  // allow to retrieve persisted messages published at reconnection time for a given clientId
  clean: false,
});

client.once('error', (error) => {
  console.error(error);
  process.exit(1);
});

client.on('message', (topic, payload) => {
  // handle incoming events
  console.log(" [x] %s: '%s'", topic, payload.toString());
});

client.subscribe(topic, { qos: 1 });

client.on('connect', () => {
  console.log('connected');
});
# Persistence
When using QoS = 1 and stateful connections (clean = false), messages will be persisted for 30 minutes.
