← Environments Swagger →
# API flows
The following description details how S1Seven can notarize companies material certificates.
# Key management flow
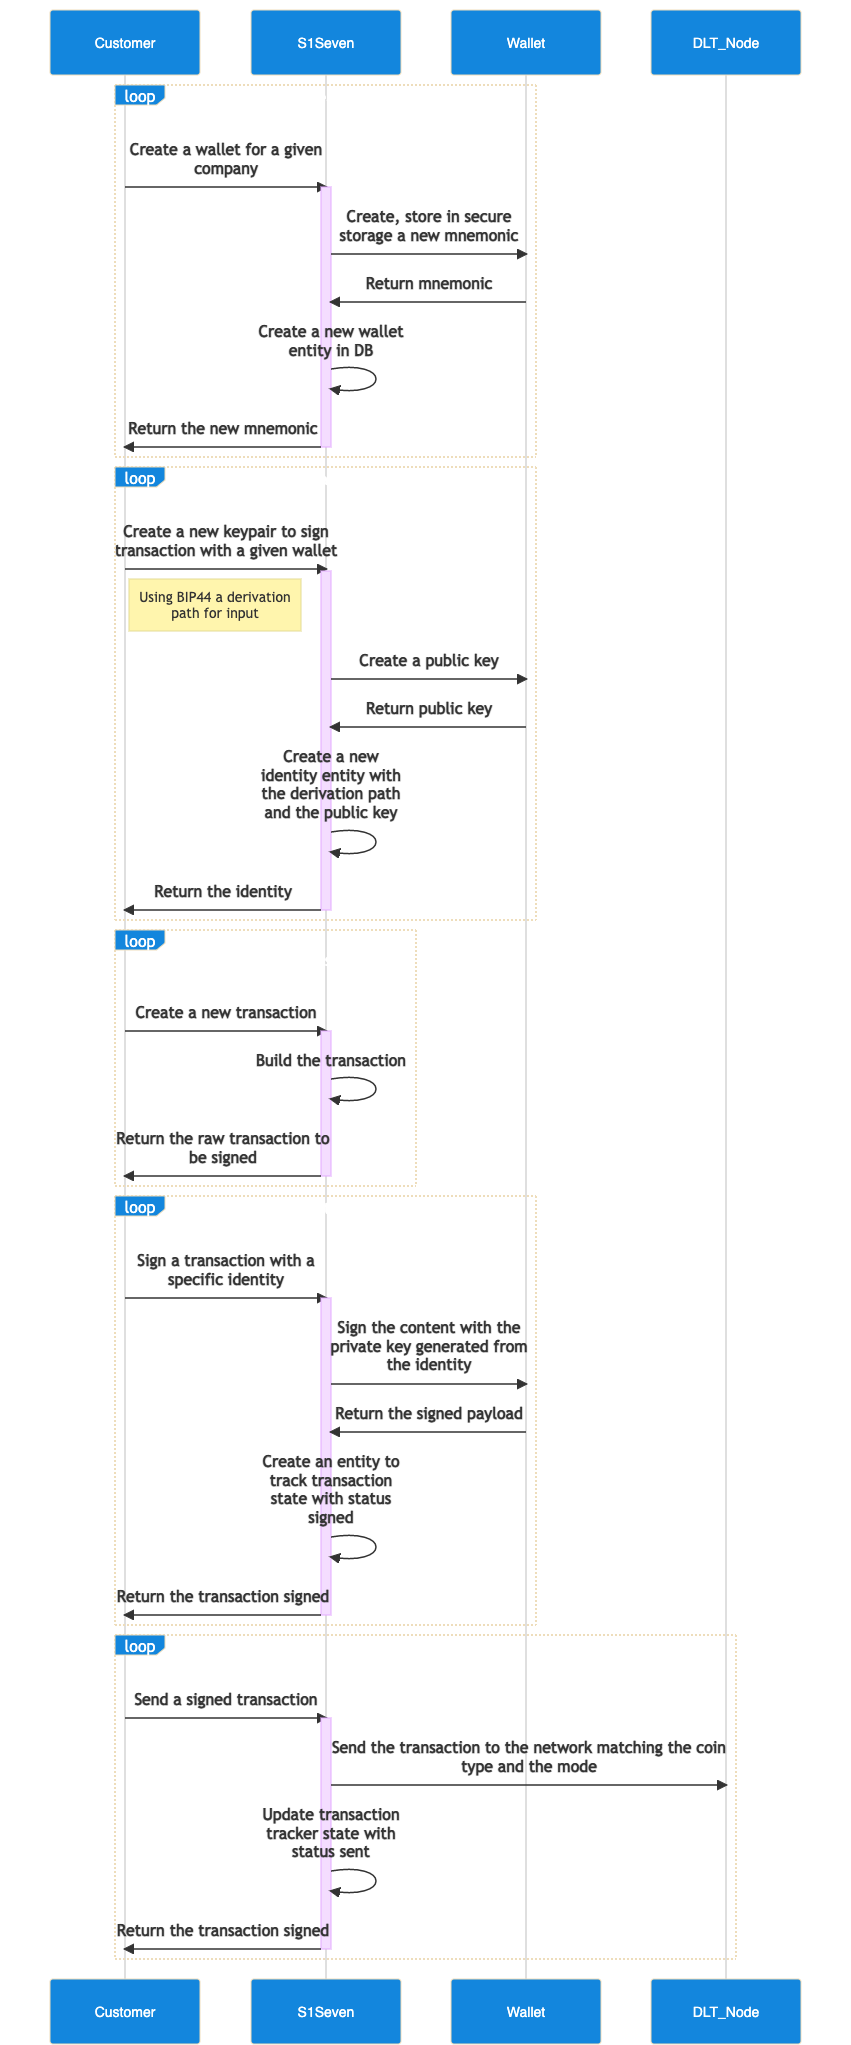
# Create a wallet
A wallet allows a company to generate key pairs to sign document and transactions for supported blockchains, it is composed by a mnemonic phrase that is the root of all key pairs.
To create a new wallet you can call the create wallet endpoint. You should set :
- the
companyHTTP header with the company's Id you previously created. - the
modeHTTP query with the context you work in
The options in body content is optional.
curl --request POST \
  --url https://<km-service>/wallets?mode=test \
  --header 'content-type: application/json' \
  --header 'company: <company-id>' \
  --header 'authorization: Bearer <jwt>' \
  --data '{
    "name": "wallet label",
    "options": {
      "language": "english"
    }
  }'
DANGER
The mnemonic that will be returned should be stored with extra care, as it will be displayed only once and it allows to recreate key pairs used to sign transactions that can be sent directly to the blockhain node.
# Create a first identity
The identities contains metadata that allows our service to create keypairs without exposing or storing their private parts. Each identity gives the path to one specific keypair that you will use in a later step to notarize certificates. The logic is based on the key derivation as described in the BIP32 (opens new window) and the key space organization as described in BIP44 (opens new window).
To create an identity, use the create identity endpoint. You should set several parameters:
- the
companyHTTP header with the company's Id you previously created - the
modeHTTP query with the context you work in - the
walletHTTP body property with the wallet's Id you previously created - the
coinTypeHTTP body property, should only be set to 822, it will scope and create keypairs working on BigChainDB. - the
accountHTTP body property, constitutes the first derivation level for the key pair creation, it can be mapped to a given department in a company for example. - the
indexwill be automatically incremented on the service side, it constitutes the second derivation level for the key pair creation, it allows to create key pairs for single usage and increase discretion of the transactions.
{
  "coinType": 822,
  "account": 0,
  "wallet": "walletId"
}
curl --request POST \
  --url https://<km-service>/identities?mode=test \
  --header 'content-type: application/json' \
  --header 'company: <company-id>' \
  --header 'authorization: Bearer <jwt>' \
  --data '{
    "coinType": 822,
    "account": 0,
    "wallet": "walletId"
  }'
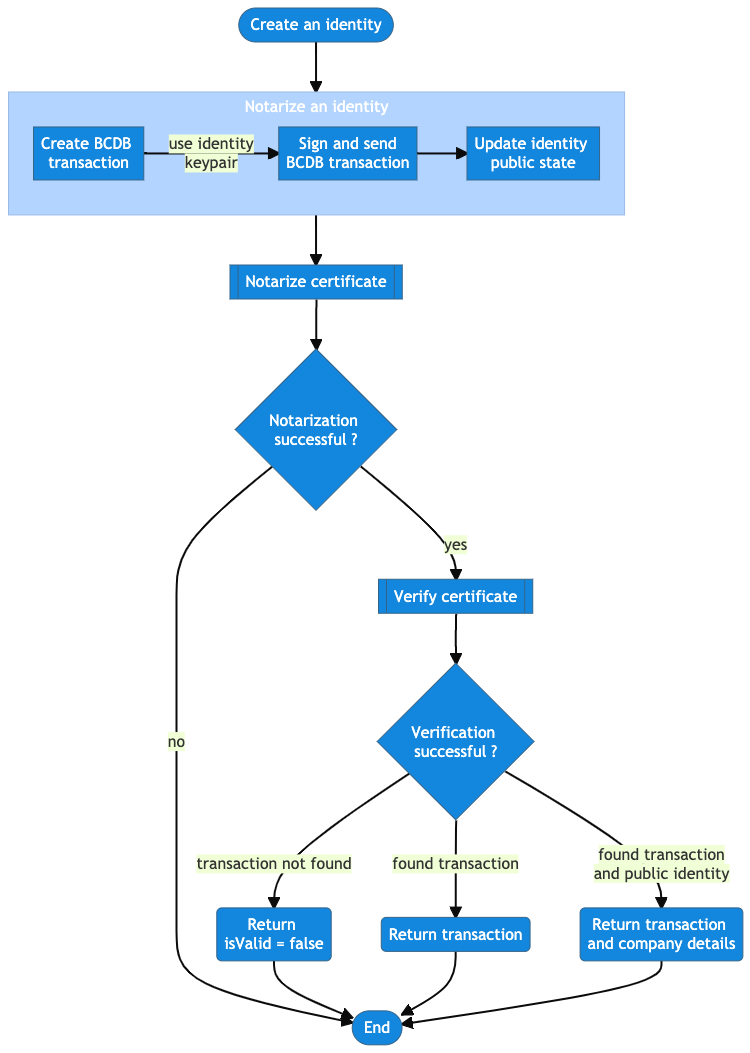
# Notarize an identity
To allow companies to make their identities (public key) public and consult public identities from other companies, an identity can be notarized. This step is irreversible, so it should be chosen carefully for identities that a company wish to be recognized publicly with.
To notarize an identity, use the notarize identity endpoint. You should set several parameters:
- the
companyHTTP header with the company's Id you previously created - the
modeHTTP query with the context you work in - the
identityIdHTTP path parameter with the Id of the identity to update
# Build a transaction
TODO
# Sign a transaction
TODO
# Send a transaction to a DLT node
TODO
# Event listeners flow
# Register a HTTP webhook
- To subscribe and react to events sent from our services, you can use register hook endpoint. You should also set the
companyHTTP header with the company's Id you previously created and set the scope (which action on which resource) that this hook will listen to.
TIP
When a specific event triggers your webhook(s) rules, it will create an Event object that will be stored 1 month to allow you to manage/review events triggered.
# Find webhook and events
By querying your webhooks using the find hook endpoint you can also retrieve the events generated during the past month.
# Retry event delivery
If an event failed to be deliver, you can retry while it is still avaiable using the retry event endpoint.
# Handle webhooks
# Minimal webhook server
Create a file webhook-server.js with this content, it will start an HTTP server on port 9000.
Node.js example
import { createHmac } from 'crypto';
import express from 'express';
import { fromPairs } from 'lodash';

function generateSignature(signature, body, API_SECRET) {
  const { t, h } = fromPairs(signature.split(',').map((s) => s.split('=')));
  const tolerance = 5;
  const currentTimestamp = Math.floor(Date.now() / 1000);
  const expectedSignature = createHmac('sha256', API_SECRET).update(body).digest('hex');
  if (expectedSignature === h && currentTimestamp - Number(t) <= tolerance) {
    return expectedSignature;
  }
  return null;
}

function serializeBody(body) {
  function replacer(key, value) {
    if (value === null || value.constructor != Object) {
      return value;
    }
    return Object.keys(value)
      .sort()
      .reduce((s, k) => {
        s[k] = value[k];
        return s;
      }, {});
  }
  return JSON.stringify(body, replacer);
}

function startServer(API_SECRET) {
  const app = express();

  app.use(
    express.json({
      verify: (req, res, buffer) => {
        req.rawBody = buffer;
      },
    })
  );

  app.post('/', (req, res) => {
    const body = serializeBody(req.body);
    // or
    const body = req.rawBody.toString();
    const signature = generateSignature(req.headers['signature'], body, API_SECRET);
    if (!signature) {
      return res.sendStatus(401);
    }

    console.log('received webhook', req.body);
    return res.sendStatus(200);
  });

  app.listen(port, () => console.log('Webhook server started on port 9000.'));
}

(function (argv) {
  const secret = argv[2] || 'z6MkoQSb6frUdZw78QEGSKfaJ5d9Bd9WHyTqqVJtnXWMDbPP';
  const port = argv[3] || 8000;
  startServer(secret, port);
})(process.argv);
Start the server with :
node ./webhook-server.js <secret_returned_by_create_hook_endpoint>
Create a local-tunnel.js file, it will start a tunnel to redirect HTTP calls to https://<my_subdomain>.loca.lt (it should match the connectionUrl declared during hook registration) to your local webhook server. Alternatively you can also use Ngrok.
Node.js HTTP tunnel example
import localtunnel from 'localtunnel';

(async (argv) => {
  const subdomain = argv[2] || 's1seven-pipe-service';
  const port = argv[3] || 8000;
  const tunnel = await localtunnel({ port, subdomain });
  console.log(`Tunnel available on ${tunnel.url}`);

  tunnel.on('close', () => {
    console.log(`Tunnel closed`);
  });
  process.on('beforeExit', () => {
    tunnel.close();
  });
})(process.argv);
Start the tunnel with your custom subdomain :
node ./local-tunnel.js <my_subdomain>
# Notarization flow
# Validate a certificate
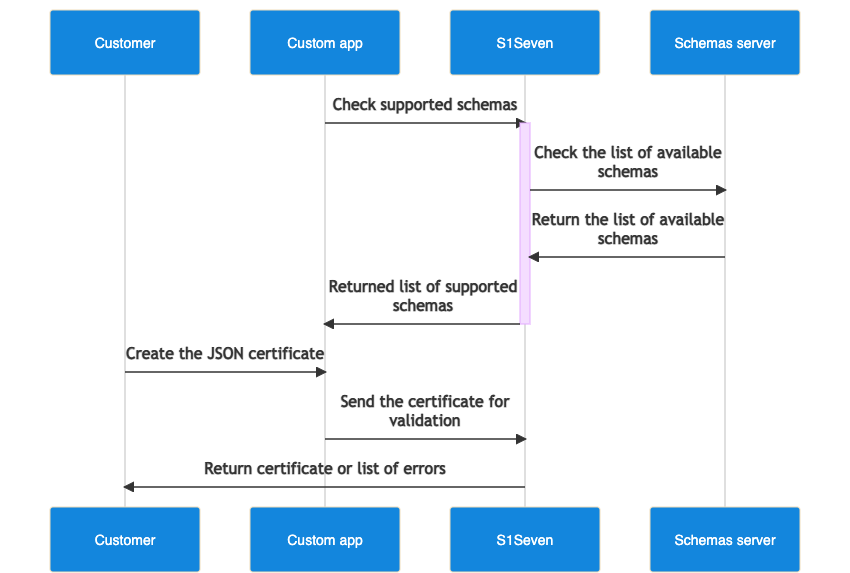
Create your own JSON certificate, you can check the supported schemas to be used in
RefSchemaUrlby calling supported schemas endpoint.Validate your certificate either by passing the json or the file (multipart/form-data) in the Http body with validate json certificate or validate file certificate endpoints.
# Render a certificate
- You can render the certificate as HTML or PDF either by passing the json or the file (multipart/form-data) in the body with render json certificate or render file certificate endpoints.
You should set the type HTTP query with html or pdf
# Notarize a certificate
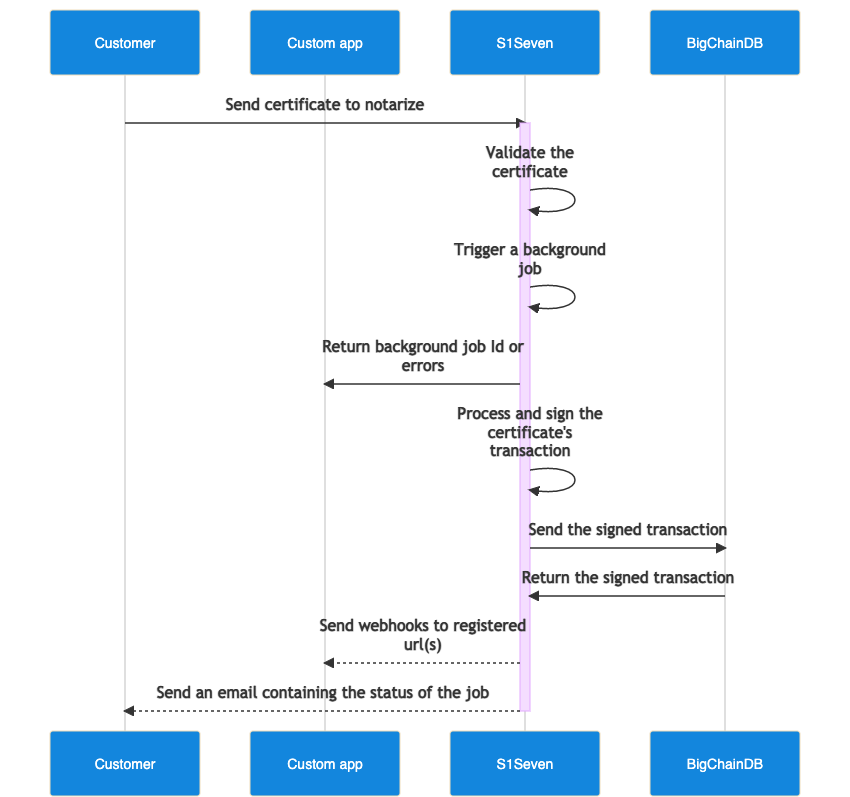
- You can notarize a certificate (the hash of serialized JSON) on BigChainDB by uploading a certificate to the notarize file certificate or the notarize json certificate endpoint.
You should set several parameters:
- the
companyHTTP header with the company's Id you previously created - the
identityHTTP query with an identity's Id you previously created - the
modeHTTP query, available values can betestandlive - the
content-typeHTTP header should be set tomultipart/form-dataorapplication/json
- If the response is successful, a new background job will be triggered and you will receive an email confirmation containing the certificate once the job is done.
If you registered a hook with the scopes list containing
{
  "resource": "certificates",
  "actions": ["notarize_one"]
}
you will also receive the payload on your registered HTTP endpoint (connectionUrl).
TIP
If accessing the email accounts and setting a webhook server are not available options, it's still possible to poll the verify endpoint and wait for a successful response.
WARNING
Certificates going through the notarization process will be stored one month for the sake of events delivery.
# Verify a certificate
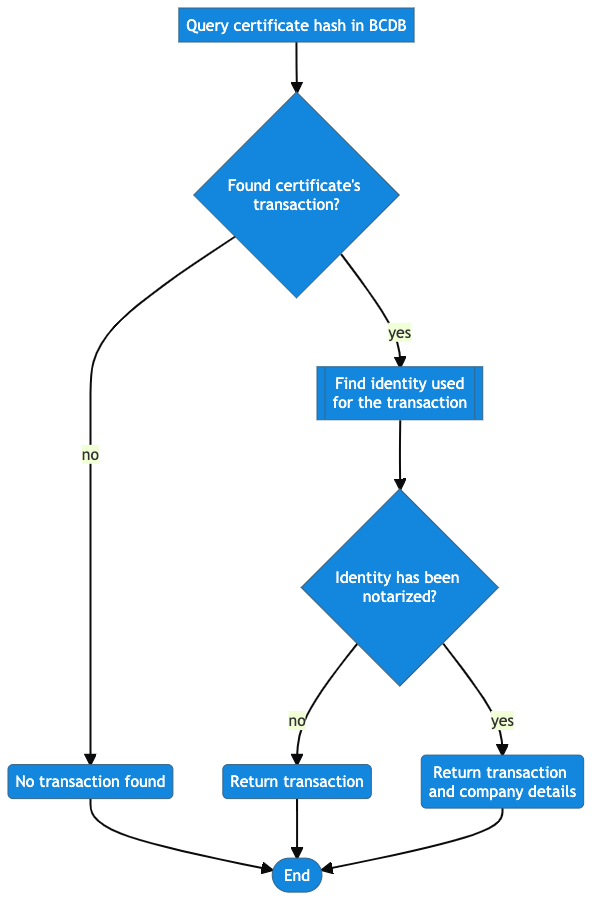
You can verify that a certificate has been notarized by uploading a file to the verify certificate endpoint. You must also provide the mode on which this certificate has been notarized by setting the HTTP query mode=<expected_mode>.
← Environments Swagger →